ArielVision – Getting Started
Using ArielVision’s simple and intuitive user interface, you can turn a SketchUp and or Mozaik 3D model into a high-quality photorealistic image quickly and painlessly. With little change in the workflow, you can design, ideate and apply materials, and you have the option to easily change reflection and lighting intensity by adjusting the values of any material to create the design aesthetic you envision.
- High quality photorealistic rendering … Fast
- Easy to learn and use
- Quickly loads model geometry
- Pre-built render ready lights for use in your 3D models
- High quality material library
We are here to help you
Phone: +1 303 713 1401 (Business hours 8am – 6pm US Mountain Time)
Contents:
- Download ArielVision (Windows only)
- Install ArielVision
- ArielVision Toolbar
- Purchase an ArielVision license
- Authenticating a purchased ArielVision license
- Video Tutorials – ArielVision
- Basic Functionality
1. Download ArielVision (Windows only)
A. Trial users
On www.renderplus.com/products, click the Try button for ArielVision.
Register to create an online account via which you will be able to download the software as follows:
- Fill in the registration form, then click the Register button.
- You will receive an email with a link to verify the email address you submitted on the registration form.
- Login to My Account (www.renderplus.com/my-account). The ArielVision trial will appear on the Licenses (Downloads/Trials) page (link on left of the page displayed). Click the Download button to start downloading the software.
You do not need any codes to run the trial.
Note: You are entitled to one free 30 day trial (full functionality, no watermarks). You can start the 30 days anytime within 30 days of you activating your online account www.renderplus.com/my-account.
B. Existing License Holders
If you are a license holder you can download the latest version of the software associated with you license via www.renderplus.com/my-account. As we updated our website in June 2025, you will need to create an account – follow the steps under the Trial section directly above to do that.
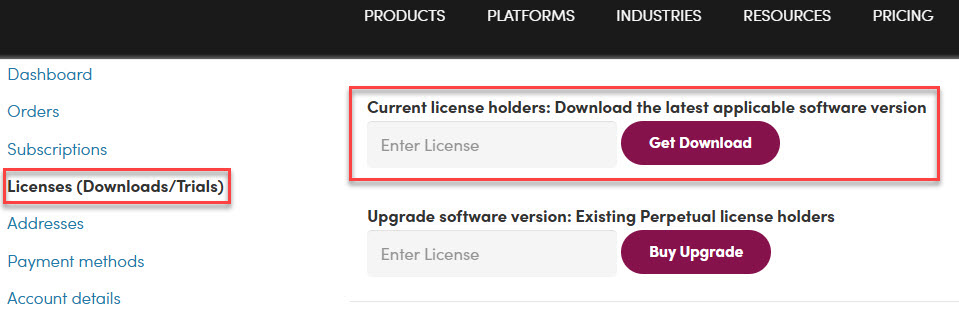
Once you have created the account and logged in (www.renderplus.com/my-account) click the Licenses (Downloads/Trials) link on the left hand side of the page.
Enter your license code in the Current license holders … field at the top of the page, then click the Get Download button (see image below). If you cannot locate your license code please email support@renderplus.com. Include the email address used when originally purchasing the software.
Click the link on the page that displays to start the download.
2. Install ArielVision
Once the Download finishes follow these instructions to install:
- If SketchUp or Mozaik is running, please save your model and close the program.
- Click the Show in folder icon next to the downloaded .exe file name in your browser.(downloads normally show as completed in the top right area of your browser).
- File Explorer will launch. Right click on the .exe file then click Run as Administrator on the submenu that appears and follow the instructions.
- When the ArielVision installation is finished, start SketchUp or Mozaik.
If you are finding it difficult to download or install the program, email support@renderplus.com
3. ArielVision Toolbar
SketchUp: If the ArielVision toolbar does not appear in the SketchUp toolbar area after installation and restarting SketchUp.
- If SketchUp was open during the ArielVision installation, please save your model then close and reopen SketchUp.
- On the SketchUp menu-bar, click Extensions. On the sub-menu that appears click the “ArielVision – load” option.
- If ArielVision is not listed, click the Extensions Manager option. Find ArielVision on the list and ensure it is Enabled.
- Restart your computer and the ArielVision toolbar should be visible in the SketchUp toolbar area.
Mozaik: The ArielVision toolbar in Mozaik has two icons, the green ball render icon being the most important.
4. Purchase an ArielVision license
It is not necessary to wait until your trial is over to purchase a license. Purchase Single, Multi-user, or Educational licenses anytime.
5. Authenticating a purchased ArielVision license
When you purchase a license, you will need to authenticate the license code you receive after installing the software (your license code is sent in an email at the time of purchase and is always available in your online account (My Account)).
- Once ArielVision is installed:
- For SketchUp users: Go to the ArielVision license dialog (click the icon on the far left of the ArielVision toolbar).
- For Mozaik users: In Mozaik 3D view with a model open, click the green ball icon in the toolbar area, click the ‘Start Rendering’ button, then right click on the rendering window header bar and click ‘License and Registration’.
- Fill in the form including the license code (code consists of 4 letters, 5 numbers, 1 letter) in the License field.
- Delete anything in the Authcode field.
- Click the Check License and Validate button and follow the prompts.
6. Video Tutorials – ArielVision
Several ArielVision tutorials are available
7. Basic Functionality
Use one of your 3D SketchUp models or download a sample from the SketchUp 3D Warehouse (search “Sample Exterior model for ArielVision”). We suggest a simple exterior, interior or object.
Let’s render it using ArielVision’s default settings without making any changes to the model. You will see the effects of the default lighting of ArielVision. For exteriors, this is easier to see if the model has roof overhangs, porches, or other features which will benefit from subtle lighting effects.
– The ArielVision Toolbar (in SketchUp)
![]()
– Start Rendering
Click the green ball render icon
After you click the render icon, the Rendering Settings dialog will appear.
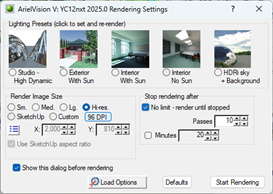
Even for exteriors, we suggest you try the ‘Studio – High Dynamic’ setting for your first rendering (click the Defaults button for the default rendering settings).
Click the Start Rendering button on the dialog
The rendering window will display and the rendered image will then start to process in it.
How long you render an image is up to you. You can set to render with ‘No limit render until stopped’, or set number of ‘Passes’ or set a specific length of time, ‘Minutes’.
To improve the quality of the rendered image set the ‘Render Image Size’ to ‘Lg’ or ‘Hi-Res’.
– Using Reflection – make a surface reflective
Right click on any surface, then hover your mouse over ArielVision on the submenu and click Edit Material on the submenu that appears.
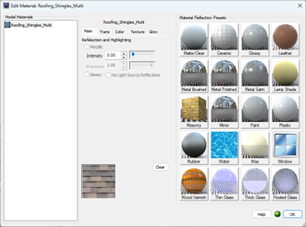
Change the amount of reflection adjusting the Intensity value (Main tab) and then the Sharpness value, if needed. Alternatively, you could select a Preset from those provided (on the right of the dialog).
– Create and Place a Table Lamp
Click the Lighs and Components icon on the ArielVision Toolbar.
Click the Table tab.
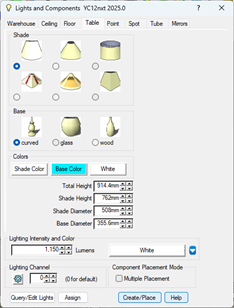
Set the shape, size and color of the table lamp as you desire.
Click the Create/Place button and place one or more (check the Multiple Placement checkbox to place multiple instances) of your customized table lamp.
Click the green ball render icon.
– Create and Place a Ceiling Light
Click the Lighs and Components icon on the ArielVision Toolbar
Click the Ceiling tab (explore the other tabs on the dialog for additional light options).
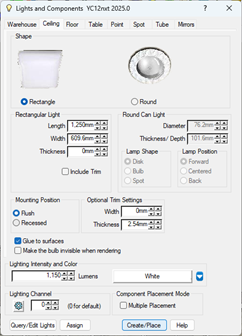
Click the shape of light (rectangle or round).
Change settings as you desire.
Click the ‘Create/Place’ button and place one or more (check the ‘Multiple Placement’ checkbox to place multiple instances) lights in the ceiling. You can also place a light you create anywhere in your model to enhance brightness (obviously works best in internal scenes) – click the “Make the bulb invisible when rendering” checkbox so you only see the effect of the light in your rendering.
Click the green ball render icon .