RPS 3D PDF – Getting Started
The RPS 3D PDF exporter will take your SketchUp models and turn them into interactive 3D PDF files that can be widely distributed and viewed with Adobe Acrobat Reader. You can post interactive 3D PDF files on your web page for product presentations or send to clients for their review and comments, making it quick and easy for them to review your creations! Features include:
- Export 3D geometry, with colors and textures, into an Interactive 3D model presented in an Adobe PDF file
- Easily add titles, notes and comments to the 3D PDF document you create using the 3D PDF Wizard
- Highly versatile since they work on the PDF operating platforms
- Create batch files to automate the creation of your 3D PDFs
We are here to help you
Phone: +1 303 713 1401 (Business hours 8am – 6pm US Mountain Time)
Contents:
- Download RPS 3D PDF (Windows only)
- Install RPS 3D PDF
- RPS 3D PDF Toolbar
- Purchase an RPS 3D PDF license
- Authenticating a purchased RPS 3D PDF license
1. Download RPS 3D PDF (Windows only)
A. Trial users
On www.renderplus.com/products, click the Try button for RPS 3D PDF.
Register to create an online account via which you will be able to download the software as follows:
- Fill in the registration form, then click the Register button.
- You will receive an email with a link to verify the email address you submitted on the registration form.
- Login to My Account (www.renderplus.com/my-account). The RPS 3D PDF trial will appear on the Licenses (Downloads/Trials) page (link on left of the page displayed). Click the Download button to start downloading the software.
You do not need any codes to run the trial.
Note: You are entitled to one free 30 day trial (full functionality, no watermarks). You can start the 30 days anytime within 30 days of you activating your online account www.renderplus.com/my-account.
B. Existing License Holders
If you are a license holder you can download the latest version of the software associated with you license via www.renderplus.com/my-account. As we updated our website in June 2025, you will need to create an account – follow the steps under the Trial section directly above to do that.
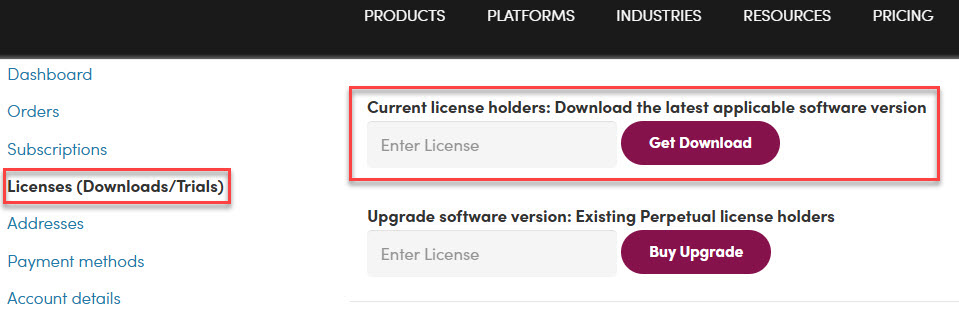
Once you have created the account and logged in (www.renderplus.com/my-account) click the Licenses (Downloads/Trials) link on the left hand side of the page.
Enter your license code in the Current license holders … field at the top of the page, then click the Get Download button (see image below). If you cannot locate your license code please email support@renderplus.com. Include the email address used when originally purchasing the software.
Click the link on the page that displays to start the download.
2. Install RPS 3D PDF
Once the Download finishes follow these instructions to install:
- If SketchUp is running, please save your model and close SketchUp.
- Click the Show in folder icon next to the downloaded .exe file name in your browser.(downloads normally show as completed in the top right area of your browser).
- File Explorer will launch. Right click on the .exe file then click Run as Administrator on the submenu that appears and follow the instructions.
- When the RPS 3D PDF installation is finished, start SketchUp
If you are finding it difficult to download or install the program, email support@renderplus.com
3. RPS 3D PDF Toolbar
If the RPS 3D PDF toolbar does not appear in the SketchUp toolbar area after installation and restarting SketchUp.
- If SketchUp was open during the RPS 3D PDF installation, please save your model then close and reopen SketchUp.
- On the SketchUp menu-bar, click Extensions. On the sub-menu that appears click the “RPS 3D PDF – load” option.
- If IRender SU is not listed, click the Extensions Manager option. Find RPS 3D PDF on the list and ensure it is Enabled.
- Restart your computer and the RPS 3D PDF toolbar should be visible in the SketchUp toolbar area.
4. Purchase an RPS 3D PDF license
It is not necessary to wait until your trial is over to purchase a license. Purchase Single or Multi-user licenses anytime.
5. Authenticating a purchased RPS 3D PDF license
When you purchase a license, you will need to authenticate the license code you receive after installing the software (your license code is sent in an email at the time of purchase and is always available in your online account (My Account)).
- Once RPS 3D PDF is installed, in SketchUp go to the RPS 3D PDF license dialog (click the icon on the far left of the RPS 3D PDF toolbar).
- Fill in the form including the license code (code consists of 4 letters, 5 numbers, 1 letter) in the License field.
- Delete anything in the Authcode field.
- Click the Check License and Validate button and follow the prompts.